Saturday, March 26, 2011

Class 3

Today's class is going to be an exciting one. We have some new concepts to work with that are a little hard at first to understand but are very powerful. Here is a look at what we are going to learn today:
  1. Review Sine Wave homework
  2. Thresholds and calibration review (lab)
  3. Arrays and for loops
  4. Control Multiple LEDs with ease using arrays and for loops(lab)
  5. Add movement with Motors (lab)
Sinewave:


Thresholds and Calibration:

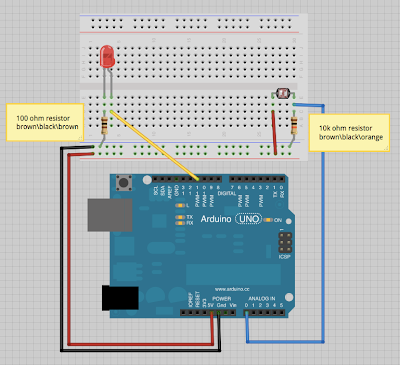
Most sensors do not generate a range of values from 0-1023 under normal working conditions. To accurately map a sensor you need to know the thresholds of the sensor. Each sensor will have a minimum and maximum threshold. Let's use a photocell to change the brightness of an LED. To do this first we will need to determine the minimum and maximum threshold of the photocell. Create the circuit below and then upload the code onto the Arduino or load the class3/autoCalibration sketch.


Once the program has been uploaded, look for the LED attached to pin 13 to light up. You now have 5 seconds to let the sensor take a hands free reading and also take a hands on reading. In the case of the photocell, let it be exposed to the ambient light of the room(this will serve as the maxThresh) and then cover up the sensor with your finger(this will serve as the minThresh). Once the pin 13 LED has turned off the loop() code will execute and you will see wonderful PWMing of a red LED.


Arrays and For Loops:

Arrays are a way of declaring multiple of the same type of variable in a row in memory. Usually they are used with the idea that the values are multiples of the same type of object. What I mean is while the value of the photocell is an integer it doesn't make sense to include it in an array of integers that represent the digital pins used to power LEDs. Arrays are declared a little differently then other variables. Here are a few ways to declare an array:

int myInts[6];// this creates an array that has 6 places but does not define what the values are
int myPins[] = {2, 4, 8, 3, 6};// this creates an array of 5 places and defines the values
int mySensVals[6] = {2, 4, -8, 3, 2};// this creates an array of 6 places but only defines the first 5 values

This is how you access the values that are store in the arrays above:

myPins[0], where the value would equal 2.

The number inside of the square brackets [ ] indicates which element to access. Arrays are 0 based, meaning the first element is considered the 0 place not the 1st place.

Here is how you change the value of an element of an array:
myPins[1] = 9;// now the values for myPins look like this: {2, 9, 8, 3, 6}

The real power of arrays is unleashed when combined with for loops. The structure of a for loop is a little confusing at first, but once you understand how to use them they are essential. Basically a for loop is a way of repeating a command a determined number of times. You can use an array to count from any number by any number to any number. This makes it perfect for working with arrays because instead of manually putting 0-4 inside of the [ ] to access the values of myPins array, you can use a variable.

Here is a for loop that prints the values of myPins array to the serial monitor:

for(int i = 0; i < 5; i++){
Serial.print(myPins[i]);
Serial.print(", ");
}
Serial.println();

This snippet of code will display the values with a comma and space between each value and then a line break after the last element has been printed. I recommend that you take a look at the for loop link above. The guys at Arduino have a wonderful description of how the mechanics work.

Let's put it into action so you can see how easy they are to use. Create the circuit below and then follow along in class to code it. I have included the code in class3/ledArray_switch. I will be coding this live in class so that you can see how to create such code. Feel free to follow along by typing or watching.


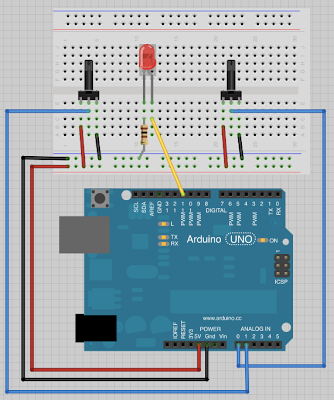
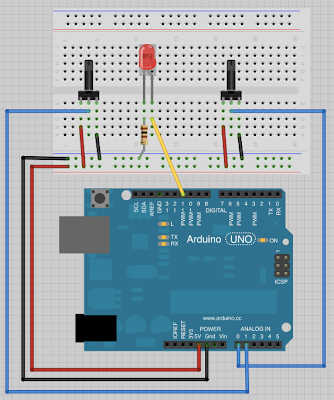
Here is the next circuit to create. This is almost the same circuit except we have switched out the switch for a potentiometer. We will use PWM on these LEDs based on a reading from the potentiometer.


Now let's swap out the potentiometer for the photocell.


Working with Motors

The arduino can allow you to control much more than LEDs. In fact you can use the arduino to physically change your environment by using motors. There are many different types of motors, but the most common are brush DC motors, servo motors, and stepper motors.

Brush DC motors : These are the most common motors. You will find them inside of toys, fans, blenders, printers, drills… the list goes on and on. The motor has two terminals, a positive and negative terminal. Simply apply power to one terminal and ground to the other and the motor will spin. Reverse which terminal gets power and ground and the direction reverses. An easy way to control the direction and power source of a motor is to use an H-Bridge.
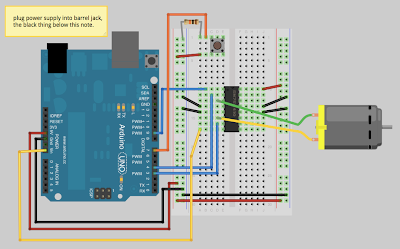
DO NOT RUN THIS CIRCUIT/SKETCH IF YOU DO NOT HAVE AN EXTERNAL POWER SUPPLY FOR THE MOTOR. Using only the 5v from the Arduino from USB is a great way to break your Arduino.

This is how you wire your Arduino to an H-Bridge to a motor.
The code for running this circuit can be found here on the class pasteBin account.


Stepper Motor : Stepper motors break down a full rotation into a number of steps. Rather than continually rotating like a DC motor, the stepper increments in steps or fractions of a rotation. While you can also use an H-Bridge to control a stepper it is easiest to use the EasyDriver stepper controller.

Servo Motor : Servos are similar to Steppers, in that you tell it to go to a certain angle and it will stop at that angle. The difference is that most packages only have a rotational range of 180 degrees. Servos are used a lot in RC cars, boats and planes to control the steering mechanisms. At its heart a servo is a DC motor with circuitry to understand how far it has rotated. It also usually has gearing to increase its torque.

Servos are incredible easy to use with the arduino. They have three wires, power, ground, and signal. A PWM signal is sent down the signal line and the servo uses that to determine where to rotate to. Arduino has a library that makes this all very easy for us. Build the circuit below and we will control the servo with a potentiometer.

Saturday, March 19, 2011

More fun with Arduino! PComp with Arduino Class 2

Here is a short list of the topics we will cover for class 2:

How to comment code and why it is important.

Variables: What they are and how to use them.

Basic Programming Structure

Lab: Inputs from sensors and intro to Pulse Width Modulation (PWM ~)

Where to find components/tools/cool stuff


Commenting (code):

Commenting code is an important part of making sense of what is going on in the code, especially when you come back to your program at a later date. Using comments, you can leave descriptions of the processes and variables used in your program. There are two kinds of commenting, line commenting(//...) and block comments(/*...*/).

Line commenting occurs each time you place two forward slashes in your code. The rest of the text on the line with the slashes is disregarded by the compiler. This is a great way to turn off one line of code but still have it available for a later time. Block comments use a combination of */ to begin the comment and */ to end the comment. Anything inside of those characters will be disregarded by the compiler. This allows you to turn off big chunks of code and create proper code descriptions.

/*

This is a block comment. Everything inside of the "/*" and "*/" is commented out.


*/

// this is also a comment


Variables:

Variables are a way of storing and accessing values in a program. There are many different types of variables, each type has a limit to how big of a number or even what type of number can be stored inside.

The standard variables available to us through Arduino are:

boolean: boolean isButtonPressed = false;

A boolean holds one of two values, true or false. (Each boolean variable occupies one byte of memory.)


char: char incomingLetter = 'a';

A data type that takes up 1 byte of memory that stores a character value. Character literals are written in single quotes, like this: 'a'.


byte: byte ledPin = 13;

A byte stores an 8-bit unsigned number, from 0 to 255.


int: int potValue = 1023;

Integers are your primary datatype for number storage, and store a 2 byte value. This yields a range of -32,768 to 32,767 (minimum value of -2^15 and a maximum value of (2^15) - 1).


word: word earthCircumference_inMiles = 24860;

A word stores a 16-bit unsigned number, from 0 to 65535. Same as an unsigned int.


long: long seconds_in_a_year = 31536000;

Long variables are extended size variables for number storage, and store 32 bits (4 bytes), from -2,147,483,648 to 2,147,483,647. Often used to reference time passed in milliseconds.


float: float pi = 3.14159;

Datatype for floating-point numbers, a number that has a decimal point. Floating-point numbers are often used to approximate analog and continuous values because they have greater resolution than integers. Floating-point numbers can be as large as 3.4028235E+38 and as low as -3.4028235E+38. They are stored as 32 bits (4 bytes) of information.


double: double phi = 1.618;

Double precision floating point number. Occupies 4 bytes. Same thing as a float.


String: String userName = "Matthew Richard";

Strings are represented as arrays of type char.


array: int ledPins[] = {3,5,6,9,10,11};

An array is a collection of variables that are accessed with an index number. Arrays in the C programming language, on which Arduino is based, can be complicated, but using simple arrays is relatively straightforward.


Program Structure:

It is important to have a standard structure when writing a program. A structure will make it easy for you and others to locate all of the components of your program.

The first part of the program should be a description of what the program is using block comments.


The second section is where you place all of your variables. Start with constants first and then group them according to their purpose. Don't forget to leave detailed comments.


The third section is for the setup() function. Void setup() is where you initialize your digital pins and communication lines.


The fourth section is for the loop() function. Void loop() is what gets executed by the microcontroller on every loop or frame. This will get repeated over and over until the microcontroller is turned off.


The fifth section(not depicted) is used for functions you create.


Sensors - how to read the world around you


At its core Arduino was designed to help gather information about the world for use in projects and art. The way we get that information with electronics is by using sensors. Sensors come in two basic flavors, digital and analog. Digital sensors send information as HIGH or LOW, or encoded in a serial protocol. Analog sensors work by changing the voltage of a circuit that is then compared to a standard. The change in voltage is the value attributed to the sensor.


The Switch and Serial Monitor:


The Switch and LED:


The Potentiometer and Serial Monitor:


PWM - introduction to Pulse Width Modulation:


Pulse Width Modulation is a process of taking a digital pin(on/off) and creating a gradient value or change. By pulsing the pin on and off in varying square waves you can achieve a range of values which can be used to "dim" an LED. I say "dim" because really the LED is being turned on and off so fast that our eyes perceive it as dim.


The Potentiometer and LED:


The Photocell and LED:


Two Potentiometers and One LED:


Where to find components/tools/cool stuff:

At some point you are going to need to add to your project. If you need it local your only options are a RadioShack or a small electronics seller in China Town. The address is 269 Canal Street and the store is located in the back. If you don't need it today, then you have a much wider option for price and availability online. I have included some of my most frequented online stores along with what they stock.

Local:

RadioShack - common components, wires and tools

269 Canal Electronics - rarer components, call and ask, not cheap, in China Town

Electronics:

SparkFun Electronics - Hacker/Hobbyist Electronics and Arduino

Adafruit

- Hacker/Hobbyist Electronics and Arduino

Evil Mad Science - Arduino and cheap LEDs

MaceTech - LED control for Arduino

Electronics Goldmine - Close out prices on electronic parts and tools, mostly older

All Electronics - Close out prices on electronic parts and tools, mostly new

Jameco - Professional Electronic Parts and ICs

Mouser - Professional Electronic Parts and ICs


Robotics:

Pololu - Motor controllers and sensors

LynxMotion - Servo housings and metal robot kits


Hardware/Materials:

SmallParts - small mechanic components and hand tools


McMaster Carr - all sorts of awesome building materials and tools, delivers fast

Friday, March 11, 2011

Welcome to Arduino! PComp with Arduino Class 1

Hello everyone, I hope your day has been well and that you ate a big breakfast because we are going to have a lot of fun.

Names and Introductions


Just a quick introduction so we can find out your name and why you are interested in the class and what your experience with programming and circuits is.

What to expect form the class


Here is a brief look at the run down of the class:
Day 1
A definition of what Physical computing.
Information about the Arduino and why it is a great platform for physical computing.
Overview of the Arduino website.
How to install and run Arduino.
Overview of the kit.
What tools you need and where to get them.
Blink (lab)
Input & Output
Digital & Analog

Day 2
Comment (code)
Variables (code)
Program structure (code)
Functions (code)
PWM
Fading using timer (lab)
Where to find components

Day 3
Fade timing: modulo (lab)
Multiple LEDs: arrays and for loops (lab)
Potentiometer: serial output (lab)
Control LED with pot: mapping (lab)
Brightness sensor: thresholds and calibration(lab)
Button counter w/state change (lab)

Day 4
Handling alternative power sources
Smoothing sensor values
Projects (color mixer, chandelier)

What is Physical Computing?


Physical Computing, or Pcomp for short, refers to the practice of using a computer to interfacing with the natural physical world. The process can include receiving data from the natural world and/or creating an output outside of the computer that effects the world. We will learn how to use microcontrollers as an intermediary between the physical world and your computer.

Intro to Arduino, Welcome to the club


The Arduino is a wonderful prototyping platform for a number of reasons. The Arduino uses an open source hardware business model. What this means is that they give away for free exactly how to make their product and they also allow you to take those plans and make their product and sell it, I believe as long as you do the same. This breeds an environment where everyone shares and everyone succeeds together growing together as the collective knowledge grows. This means that there are tons of code lying around the web waiting for you to search for them and throw them onto your arduino, making simple work of simple projects. This also means that many people have designed add-ons to the original platform that interface easily and add a great deal of functionality. So welcome to the club, have fun and enjoy the life.


Intro to Arduino, Welcome to the club

There are many things you can do with the Arduino platform. Here are few of my favorites:
Botanicalls - allows plants to call their owners to tell them they need water or nutrients
SIMbaLink - smart solar harvesting
Intersects the Plane - robotic light sculpture

How to Install Arduino


The people at Arduino have put together a wonderful intro to the arduino for any of the major platforms. Check out the link and follow along to install get started when you get back to your house.

Arduino web resources


There are a ton of web resources available for the Arduino. Here are a few of my go to places to look for help:
The Arduino website includes an entire run down of the arduino language.
The website also includes a ton on how to get started including examples, foundations, and links to other resources.
Along with the code that comes with Arduino, you can use code people have created to work with Arduino. These are called libraries and they can be found here. Most libraries will have links to more information on how to use the code they provide.
While you might think that you have a unique idea, this is almost certainly not the case. Check the forums at Arduino (old forum) to see if anyone has already solved the problem you are trying to figure out.


What are our materials


Here is a run down of the parts in the kit:


  • 1 Arduino Uno


  • 1 breadboard


  • 1 USB cable (A to B)


  • 2 momentary(or biased) switches


  • 2 potentiometers


  • 1 photoresistor


  • 5 red LEDs


  • 3 superbrite LEDs


  • 5 100 ohm resistors


  • 5 1000 ohm resistors


  • 5 10000 ohm resistors


  • 1 bundle of jumper wires

  • Lets make something blink!


    For startes we are going to use the basic Arduino introduction sketch, the blinking LED. Now while this is a basic sketch, it is an amazing experience, I remember my first blinking LED well. Lets jump to the Arduino site to take a look at the sketch.

    The difference between input and output


    This is pretty simple, inputs are values and processes associated with things coming into the Arduino, while an output is a value that is sent out from the Arduino. Human inputs are our five senses and our outputs are using our body in any way to effect the outside world for example talking.